linux安装Seafile
安装 Seafile 服务器之前,请确认已安装以下软件
- python 2.7
- python-setuptools
- python-imaging
- python-ldap
- python-urllib3
- sqlite3
Debian/Ubuntu 环境
apt-get update
apt-get install python
apt-get install python2.7 libpython2.7 python-setuptools python-imaging python-ldap python-urllib3 ffmpeg python-pip sqlite3
pip install pillow moviepy
#安装java
apt install default-jre
CentOS 7
yum -y install epel-release
rpm --import http://li.nux.ro/download/nux/RPM-GPG-KEY-nux.ro
yum -y install python-imaging MySQL-python python-memcached python-ldap python-urllib3 ffmpeg ffmpeg-devel
pip install pillow moviepy
开始安装
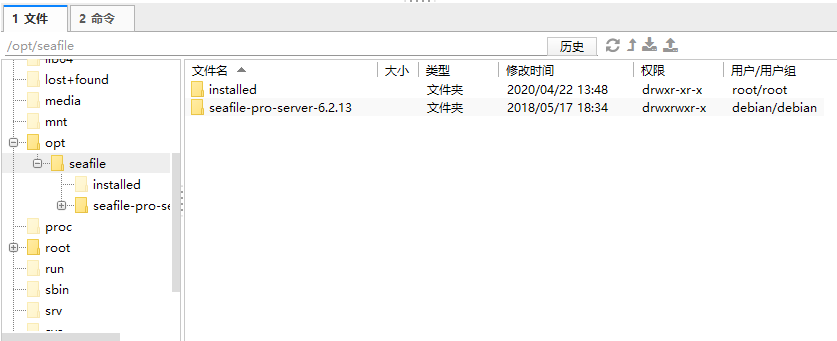
- 推荐把压缩包放在/opt/seafile(新建)中,压缩包解压后,把压缩包放在installed(新建)中,然后cd进入seafile-pro-server-6.2.13

#解压安装包
tar -xzf seafile-server_*

#新建installed目录,存放压缩包
mkdir installed

#转移压缩包
mv seafile-server_* installed

#进入目录
cd seafile-server-*

 #运行安装脚本并回答预设问题
./setup-seafile.sh

#启动 Seafile 服务
./seafile.sh start

#启动 Seahub 网站 (默认运行在8000端口上)
./seahub.sh start

#停止 Seahub
./seahub.sh stop

#停止 Seafile 进程
./seafile.sh stop

#停止当前的 Seafile 进程,然后重启 Seafile
./seafile.sh restart

 #停止当前的 Seahub 进程,并在 8000 端口重新启动 Seahub
./seahub.sh restart

#如果只有ipv6的服务器,ip就选择为127.0.0.1,然后使用nginx进行反代

#安装nginx
apt-get install nginx

#配置文件目录:/etc/nginx/conf.d

#重启nginx
service nginx restart
配置文件
server {
    listen 80;
    listen [::]:80;
    server_name sf.qianxunyun.cn;

    proxy_set_header X-Forwarded-For $remote_addr;

    location / {
         proxy_pass         http://127.0.0.1:8000;
         proxy_set_header   Host $host;
         proxy_set_header   X-Real-IP $remote_addr;
         proxy_set_header   X-Forwarded-For $proxy_add_x_forwarded_for;
         proxy_set_header   X-Forwarded-Host $server_name;
         proxy_read_timeout  1200s;

         # used for view/edit office file via Office Online Server
         client_max_body_size 0;

         access_log      /var/log/nginx/seahub.access.log;
         error_log       /var/log/nginx/seahub.error.log;
    }

    location /seafhttp {
        rewrite ^/seafhttp(.*)$ $1 break;
        proxy_pass http://127.0.0.1:8082;
        client_max_body_size 0;
        proxy_set_header   X-Forwarded-For $proxy_add_x_forwarded_for;
        proxy_connect_timeout  36000s;
        proxy_read_timeout  36000s;
    }
    location /media {
        root /opt/seafile/seafile-server-latest/seahub;
    }
    location /seafdav {
        fastcgi_pass    127.0.0.1:8080;
        fastcgi_param   SCRIPT_FILENAME     $document_root$fastcgi_script_name;
        fastcgi_param   PATH_INFO           $fastcgi_script_name;
        fastcgi_param   SERVER_PROTOCOL     $server_protocol;
        fastcgi_param   QUERY_STRING        $query_string;
        fastcgi_param   REQUEST_METHOD      $request_method;
        fastcgi_param   CONTENT_TYPE        $content_type;
        fastcgi_param   CONTENT_LENGTH      $content_length;
        fastcgi_param   SERVER_ADDR         $server_addr;
        fastcgi_param   SERVER_PORT         $server_port;
        fastcgi_param   SERVER_NAME         $server_name;
        fastcgi_param   REMOTE_ADDR         $remote_addr;

        client_max_body_size 0;

        access_log      /var/log/nginx/seafdav.access.log;
        error_log       /var/log/nginx/seafdav.error.log;
    }
}
关闭搜索功能(特别占用内存) 路径(/opt/seafile/conf/seafevents.conf)
[INDEX FILES]
## must be "true" to enable search
enabled = true
## The interval the search index is updated. Can be s(seconds), m(minutes), h(hours), d(days)
interval=10m
## If true, indexes the contents of office/pdf files while updating search index
## Note: If you change this option from "false" to "true", then you need to clear the search index and update the index again.
index_office_pdf=false
官方处理链接地址:https://www.bookstack.cn/read/Seafile-manual/45.md
限制jvm内存大小的方法
# 第22行 :-Xms1g 改成-Xms512m 或者-Xms128m 试试
seafile-server-latest/pro/elasticsearch/config/jvm.options
版权声明:
作者:亦灵一梦
链接:https://blog.haokaikai.cn/2020/jingpin/linuxabb/942.html
来源:开心博客
文章版权归作者所有,未经允许请勿转载。
THE END
1
二维码
海报
linux安装Seafile
安装 Seafile 服务器之前,请确认已安装以下软件
python 2.7
python-setuptools
python-imaging
python-ldap
python-urllib3
sqlite3
Debian/Ubuntu 环境
ap……

